 The Autoklose
The Autoklose Campaign Editor just got better and much more powerful! We listened to your feedback and took notes, which resulted in a host of new features and functionality added to the platform.
The main goal was to streamline email campaign creation and guide you through the process step by step.
As of now, our Campaign Flow is much more intuitive, and it will be even easier for you to craft your email campaigns for success. We even offer tips with which you’ll be able to boost your email marketing efforts and better tailor your campaigns to your audience’s needs and preferences.
There are still the same 5 easy steps, and we just polished the design and user experience so that you don’t have to scratch your head as to what you should do next.
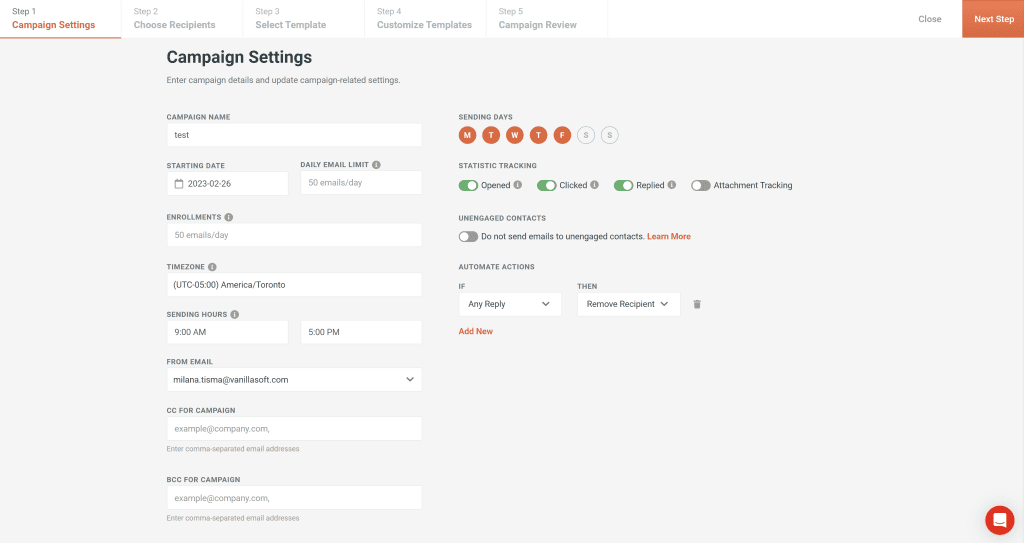
Step 1 – Campaign Settings
In this step, you can name your campaign and define a number of different settings, such as selecting sending days, timezone, and sending hours. However, it would be a good idea to read relevant resources and schedule your campaign for the best times for outreach and prospecting.
Besides that, the Automate Actions feature allows you to choose among different conditions and combine them with one of the automatic responses. This way, you’ll additionally customize your email campaigns.
This is also the moment to pick the campaign statistics you want to track, decide if you wish to send emails to unengaged contacts, and select the email account from which you want to send your campaign.
Finally, in this window, it’s possible to adjust your daily email limit.
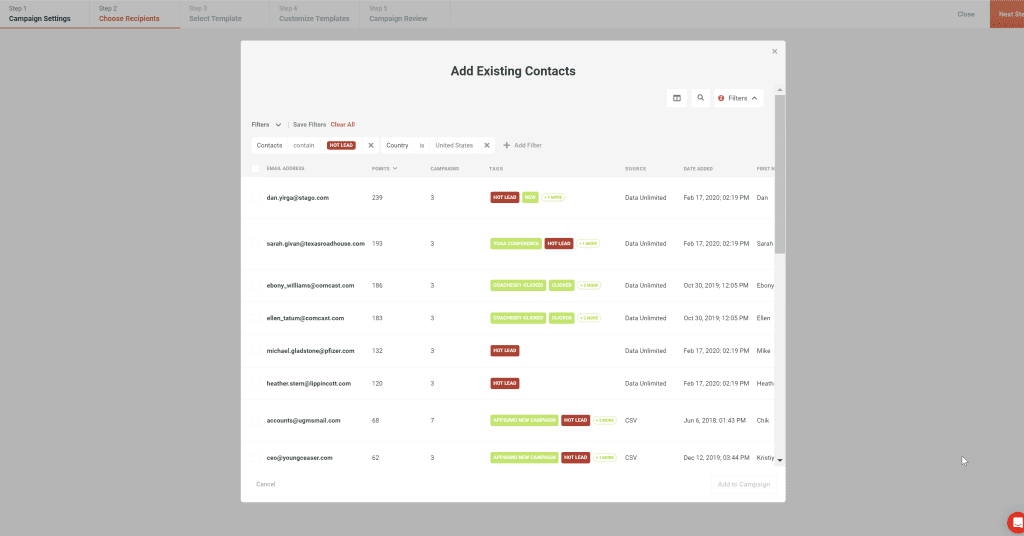
Step 2 – Choose Recipients
As its name suggests, this step is all about adding recipients to your email campaign.
You can do this by adding them from your existing contacts, adding new contacts, uploading a .CSV file, or using contacts from our DataUnlimited feature.
Our B2B database is packed with millions of clean and verified leads from different industries, and the filtering functionality allows you to set detailed parameters. This way, you can select contacts based on their role, seniority level, geographic location, role, phone number, and email, to mention just a few.
Even though there are different sources from which you can upload your contacts, Autoklose makes sure that there are no duplicates in your email campaign by consolidating them.
This is the step in which you will segment your recipients and send them tailored and relevant content only, thus increasing your open, click-through, and reply rate.
What can additionally help your emailing efforts are Tags – a feature that categorizes your contacts based on how engaged they are with the content you send them. This means that you can create an email campaign and target hot leads only.
To make things even easier for you, we performed a complete overhaul of our Contacts page by redesigning the Action Menu buttons, enhancing the Filters functionality, improving the Contact Table section, and making changes to the Action Bar menu.
All this means you can have a clear overview and full control of all your contacts, even if your lists are extensive.
This update allows you to
- Streamline your contact management workflow
- Create, save, and update custom filters
- Import DataUnlimited contacts and add them to campaigns more easily
- See and edit all the tags applied to a contact in a single contact view
- Sort, organize, navigate, and segment your contacts more smoothly.
To learn more about all the benefits of the Contacts page update and how to make the most of it, check out our Help article.
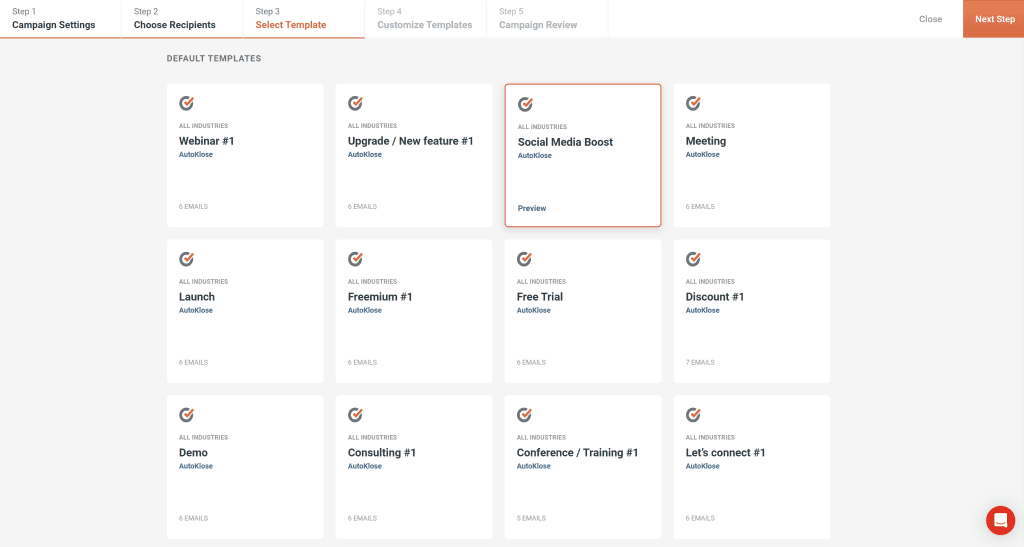
Step 3 – Select Template
In this step, it’s time to select an email template sequence that you want to customize and send to your recipients.
And again, you have several options:
- Select a blank template and start everything from scratch
- Select one of our existing templates or sequences for different business situations and customize them
- Pick one of your well-performing templates and send it to new recipients.
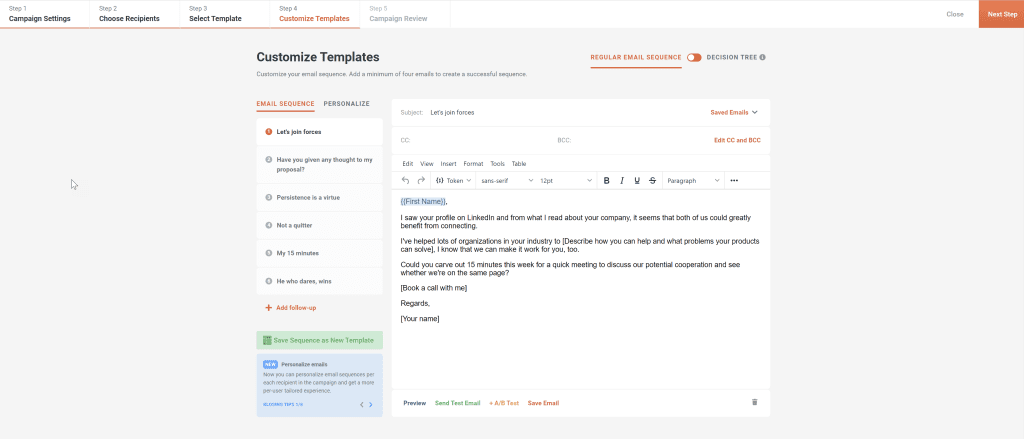
Step 4 – Customize Template
After you’ve selected your templates, it’s time to customize them.
You can attach files, leverage video prospecting, add tokens or custom fields, insert an infinite number of follow-ups, intervals, etc., inside your templates.
Our latest update transforms the Email Editor into a fully-fledged word processor and image editor. As of now, you have full control over the formatting of your emails and their design without resorting to some third-party tools.
Here’s a recap of the new functionality:
- Get creative, change text size, fonts, color, and text background color; adjust alignment and indentation, or add special characters and emojis.
- Implement clear formatting, alignment, and indentation
- Play with source code to create or edit your emails
- Insert images from different sources, edit their placement within the message, and choose the border style
- Change the text of your unsubscribe text, which can be useful especially if your recipients aren’t from English-speaking countries
- Add video using the Vidyard plugin
- Show the editor in fullscreen mode
Advanced plans come with an even more robust set of features including
- PowerPaste, which allows you to copy text together with formatting from external sources such as Microsoft or Google Docs
- Format Painter, which allows you to copy and paste the font style, size, color, and other formatting elements from one location to the other
- Advanced code editor for an easier HTML editing
- Enhanced image editing that goes beyond image placement and allows you to flip, rotate, crop, resize, and apply filters to your images.
- Merge Tags allows you to insert predefined personalization tokens, aka merge tags, in your message. Searching for a particular merge tag in the drop-down menu is possible.
- The signature editor makes creating brand new or re-create existing signatures easy. Thanks to PowerPaste, you can copy a signature from your email client and paste it into the Signature field verbatim.
For a more detailed description of how these features work, check out our Help article.
It’s important to state that our powerful Autoklose Template Analyzer will highlight any spam words or phrases, and prompt you to remove them, thus helping you avoid relentless spam filters and improving your deliverability.
Another valuable option is A/B testing, with which it will be easy for you to identify what works and what doesn’t and stick to a winning template.
Finally, you can share your templates with your teammates and ask them for their opinion.
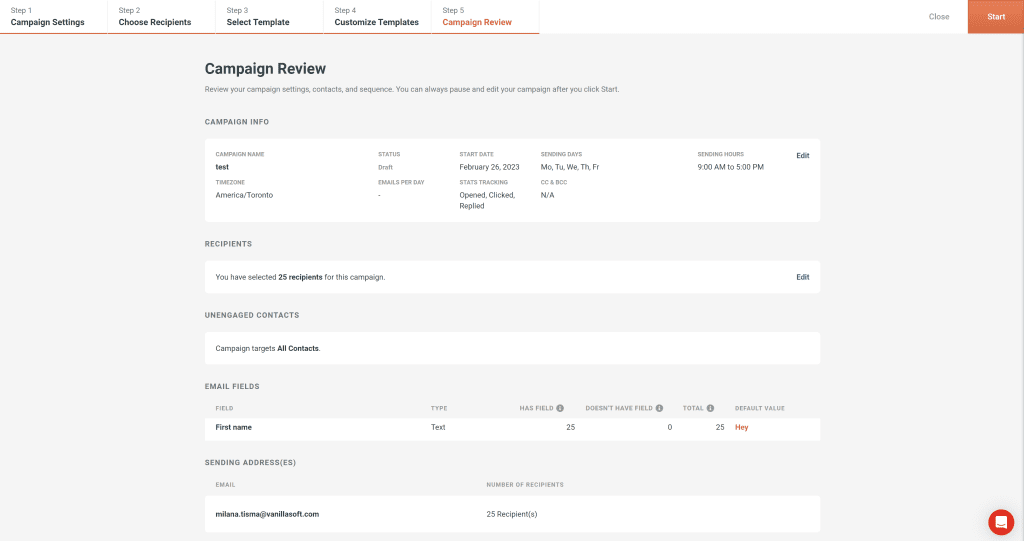
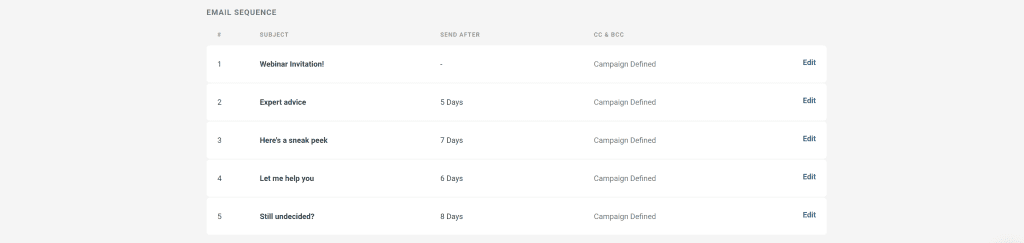
Step 5 – Campaign Review
After you have adjusted and tweaked everything, it’s time to review your email campaign and check whether everything is set correctly.
This window lists all the Campaign elements, including the number of recipients, starting date, sending days and hours, timezone, the status of the campaign, as well as what stats will be tracked.
You can also preview your email sequence and email fields, as well as see whether the campaign targets unengaged contacts too.
In a nutshell, the Campaign Review is like a mini dashboard with all your campaign settings in one place, from which you can easily edit them and hit Start.
Close more deals faster! Sales engagement platform and B2B data all-in-one. 


Leave a Reply
You must be logged in to post a comment.